


Introduction
Haskell, a functional programming language, stands apart from mainstream languages like Java and Python. While Java and Python boast vast communities and extensive frameworks for diverse applications, ranging from networking to deep learning, Haskell, despite its relative unpopularity, offers a rich ecosystem of libraries, many of which are maintained by the open-source community.
In the fields of Machine Learning and Deep Learning, Python is a dominant force in training Deep Learning models, leveraging libraries like PyTorch. Interestingly, Haskell has its own equivalent: Hasktorch. Thanks to the Foreign Function Interface (FFI), Hasktorch seamlessly integrates LibTorch, the C++ distribution of PyTorch, into the Haskell environment. In this blog post, we will explore Hasktorch and see how FFI allows bringing the powerful capabilities of LibTorch to the Haskell ecosystem.
Tensors 101
In the realm of Deep Learning, every element, from input and output data to weights and biases, is represented by a tensor, each with a unique shape. Even Large Language Models (LLMs) rely on tensor representations to process and comprehend text, as computers cannot directly interpret raw linguistic data.
Before we begin, we need to understand that tensors in mathematics (and physics) and in computer science have different definitions and properties:
- In computer science, a multidimensional data structure, such as an array of objects, represents an observation. Examples include a student's list of grades or the arrangement of pixels in an image within an NxN Matrix.
- In Mathematics, it's more than just a data structure; it's an algebraic object with clearly defined operations and properties that allow it to represent physical phenomena.
If you're familiar with Python, you'll recognize the concept of arrays and their operations from the Numpy library. Tensors are essentially arrays, which are defined by their shapes (or, more precisely, dimensions), as illustrated in Figure 1.
- A 0-dimensional (0D) is a scalar, a number.
- A 1-dimensional (1D) tensor is an array or list.
- A 2-dimensional (2D) tensor is an MxN Matrix.
- A 3-Dimensional (3D) tensor is a more complex object, often visualized as a 3D structure (like a cube) possessing width, height, and depth. It is commonly denoted as an MxNxN tensor. An image represented by its pixels is the best example of this type of tensor.
Unlike numpy arrays, which are primarily executed on the Central Processing Unit (CPU), the operations involving tensors are executed on both the CPU or a Graphics Processing Unit (GPU). The GPU is often the preferred choice because it can significantly accelerate the processing of complex, tensor-represented data.

While this introduction to tensors was simple, it serves as a helpful memory refresh on a basic concept of Deep Learning, which is relevant as the primary focus of this post is Hasktorch.
Introduction to Libtorch
While PyTorch is a widely recognized library for Deep Learning, it inherits some of Python's drawbacks, such as slower performance and a lack of static types. For better performance and deployment of production-grade models, the C++ implementation, known as LibTorch, is often the preferred alternative.
Libtorch provides the same APIs as PyTorch, serving as the PyTorch C++ frontend. Both the C++ and Python implementations rely on the same underlying C++ tensor library, known as ATen, which functions as the backend.
Given their striking similarity, you'll find that defining a basic neural network appears nearly identical in both C++ and Python (as shown in examples from this tutorial).
Here’s an example in Python of a small Neural Network model with its Weights and bias:
class Net(torch.nn.Module):
  def __init__(self, N, M):
    super(Net, self).__init__()
    self.W = torch.nn.Parameter(torch.randn(N, M))
    self.b = torch.nn.Parameter(torch.randn(M))

  def forward(self, input):
    return torch.addmm(self.b, input, self.W)
And its equivalent in C++:
#include <torch/torch.h>

struct Net : torch::nn::Module {
  Net(int64_t N, int64_t M) {
    W = register_parameter("W", torch::randn({N, M}));
    b = register_parameter("b", torch::randn(M));
  }
  torch::Tensor forward(torch::Tensor input) {
    return torch::addmm(b, input, W);
  }
  torch::Tensor W, b;
};
Hasktorch integrates the PyTorch C++ APIs into the Haskell environment. This integration is facilitated by the Foreign Function Interface, a concept that will be discussed in detail in the following section.
Foreign Function Interface (FFI)
If you have performance-critical C code that you need to integrate into a Haskell application, and you want to directly reuse existing implementations without the overhead of an HTTP service, the Foreign Function Interface (FFI) is the solution. FFI enables direct calls to C functions from your Haskell code.
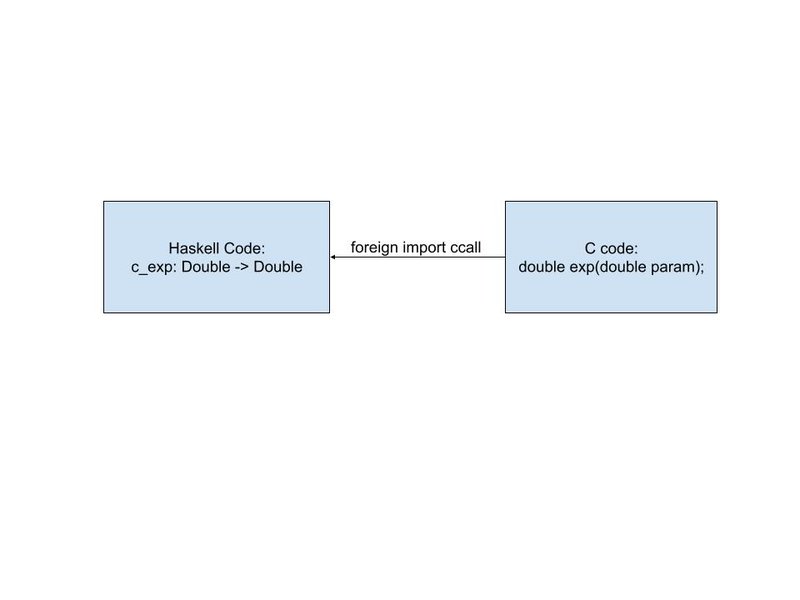
From a developer's perspective, this involves declaring which C functions—including their return types and parameters—will be accessible from Haskell. This is achieved using the foreign import ccall statement, which informs the Haskell compiler of the function's name and signature. This statement often has the following form:
foreign import ccall "exp" c_exp :: CDouble -> CDouble
The function exp is a C function that takes a Double and returns a Double. There are significant constraints. All types must be FFI-safe types defined in Foreign.C.Types or types with a Storable instance (like pointers). Native Haskell types like String or custom ADTs cannot be passed directly.
Let’s explore this with a minimal example.
Let’s say you have the following C function that adds two numbers, and you need to call it from Haskell:
#include <stdio.h>
#include "HsFFI.h" // Needed for standard Haskell/C types if used

// A simple C function to add two integers
HsInt32 my_add(HsInt32 a, HsInt32 b) {
    printf("C side: Received %d and %d. Calculating sum...\n", a, b);
    return a + b;
}
Then, in the Haskell code, you need to declare the foreign import so the C code can be called from Haskell. You need to specify the argument and return types according to the C declaration:
import Foreign.C.Types (CInt(..))
import System.IO (hFlush, stdout)

-- 1. The Foreign Import Declaration
-- We tell Haskell to look for the function 'my_add' using the C calling convention (ccall).
foreign import ccall unsafe "my_add"
  c_my_add :: CInt -> CInt -> CInt

-- 2. The Haskell Wrapper Function
-- This converts native Haskell 'Int' types to C's 'CInt' and back,
-- and ensures the print statement in C gets flushed correctly.
haskell_add :: Int -> Int -> IO Int
haskell_add a b = do
  -- Note: We must convert from Int to CInt for the foreign call.
  let result = c_my_add (fromIntegral a) (fromIntegral b)
  hFlush stdout -- Force the C 'printf' output to display immediately
  -- Note: We must convert the CInt result back to Int.
  return (fromIntegral result)
This is a minimal example, and you need to build the files, both Haskell and C, and then there will be an executable available to run this minimal program.
aflores@ec-2017-33-lp-acoronel:~/Documents/cExamples/ffi-example$ ghc Main.hs cExample/mymath.c -o custom_app
Loaded package environment from /home/aflores/.ghc/x86_64-linux-9.2.5/environments/default
[1 of 2] Compiling CustomFFI        ( CustomFFI.hs, CustomFFI.o )
[2 of 2] Compiling Main             ( Main.hs, Main.o )
Linking custom_app ...
aflores@ec-2017-33-lp-acoronel:~/Documents/cExamples/ffi-example$ ./custom_app
Calling C function from Haskell...
C side: Received 10 and 32. Calculating sum...
Haskell side: The final result is: 42
The foundation of Haskell FFI has been covered, but another technique exists: using quasiquoters to embed C code blocks directly within Haskell. This feature, known as inline C, enables the creation of C functions and code without the need for an external C file, allowing for immediate use within Haskell:
{-# LANGUAGE QuasiQuotes #-}
{-# LANGUAGE TemplateHaskell #-}

import qualified Language.C.Inline as C

C.include "<stdio.h>"
C.include "<math.h>"

main :: IO ()
main = do
   x <- [C.exp| int{ printf("Some number: %.2fn", cos(0.5)) } |]
   putStrLn $ show x ++ " characters printed."
How Hasktorch uses Libtorch with FFI
Now, let's look at how Hasktorch leverages the Foreign Function Interface (FFI) to integrate the PyTorch C++ APIs into Haskell thanks to a specialized library for C bindings called libtorch-ffi. If you are familiar with building custom Deep Learning models, you might remember the Transpose operation, which is basically defined as:
Returns a tensor that is a transposed version of input. The given dimensions dim0 and dim1 are swapped.
That is, replacing rows with columns, if you recall the transpose of a Matrix from Linear Algebra.
The Hasktorch definition is available in Torch.Functional module as follows:
transpose
 :: Tensor -- ^ self
 -> Int -- ^ dim0
 -> Int -- ^ dim1
 -> Tensor
transpose _self _dim0 _dim1 = unsafePerformIO $ (cast3 ATen.transpose_tll) _self _dim0 _dim1
This process utilizes the transpose_tll function, which is sourced from the libtorch-ffi library. As seen in its implementation, this function uses inline C code to leverage libtorch for computing the tensor's transpose:
transpose_tll
  :: Ptr Tensor
  -> Int64
  -> Int64
  -> IO (Ptr Tensor)
transpose_tll _self _dim0 _dim1 =
  [C.throwBlock| at::Tensor* { return new at::Tensor(at::transpose(
    *$(at::Tensor* _self)
  , $(int64_t _dim0)
  , $(int64_t _dim1)));
  }|]
Other tensor operations in Hasktorch, like the transpose, are implemented similarly. These are essentially C bindings to the Torch C APIs provided by the libtorch and ATen libraries. This simple example is just the beginning; I encourage you to explore FFI further and explore more in the Hasktorch repository.
Hasktorch Example
Before diving in, it's essential to understand that Hasktorch operates within the Differentiable Programming paradigm. This approach is well-suited for Neural Networks, which are essentially mathematical functions. The network processes input data through forward propagation and adjusts its parameters during backward propagation by calculating derivatives and evaluating a loss function.
Hasktorch uses Algebraic Data Types (ADTs) to represent Neural Networks as Haskell expressions, which allows for the representation of Deep Learning models like Convolutional Neural Networks. This approach enables the implementation of additional functionality through typeclasses. Specifically, differentiability in a model represented by an ADT is specified in Hasktorch by implementing the Torch.NN.Parameterized typeclass. More details on differentiability can be found in the dedicated tutorial on the Hasktorch website:
class Parameterized f where
  flattenParameters :: f -> [Parameter]
  default flattenParameters :: (Generic f, Parameterized' (Rep f)) => f -> [Parameter]
  flattenParameters f = flattenParameters' (from f)

  replaceOwnParameters :: f -> ParamStream f
  default replaceOwnParameters :: (Generic f, Parameterized' (Rep f)) => f -> ParamStream f
  replaceOwnParameters f = to <$> replaceOwnParameters' (from f)
Now, let's explore a simple example. While the Hasktorch GitHub repository includes a section on local setup, I personally faced challenges, particularly with installing the Libtorch C++ dependencies. A much simpler approach for starting development is utilizing their Skeleton template, which uses Nix, and is a better way to get started working with Neural Networks in Haskell.
We will use the standard MNIST digit image classification as our example, aiming to classify numbers from 0 to 9. This classification is based on the MNIST dataset, which consists of grayscale images (1 channel instead of the usual 3). Note that the repository for this framework also provides this same example.
As a brief refresher, image classification is commonly tackled with Convolutional Neural Networks (CNNs). While this post doesn't cover the specifics of CNNs, I suggest checking out this Computerphile video to understand better or refresh your knowledge on the topic.
So our small CNN will have the following structure:
- First Convolution layer: 1 Channel input, 20 channels of output and 5x5 Kernel.
- Second Convolution layer: 20 channels input, output of 50, same 5x5 Kernel.
- Linear layer: 800 input features and an output of 500.
- Last output layer: 500 input features and output of 10 features representing the probability of classifying each digit.
Taking into account the above, our model is implemented in the following way:
data CNNSpec (dtype :: DType) (device :: (DeviceType, Nat))
  = CNNSpec
  deriving (Show, Eq)

data CNN (dtype :: DType) (device :: (DeviceType, Nat)) where
  CNN ::
    forall dtype device.
    { conv0 :: Conv2d 1 20 5 5 dtype device,
    conv1 :: Conv2d 20 50 5 5 dtype device,
    fc0 :: Linear (4 * 4 * 50) 500 dtype device,
    fc1 :: Linear 500 ClassDim dtype device
    } ->
    CNN dtype device
  deriving (Show, Generic, Parameterized)
Notice that we have two Algebraic Data Types (ADTs). The first is CNNSpec, which is used to create an instance of the Randomizable typeclass for random initialization of the CNN, as shown in the code snippet below. The second is the CNN ADT, which is the actual model and already derives the Parameterized typeclass to make it differentiable.
instance
  ( KnownDType dtype,
    KnownDevice device,
    RandDTypeIsValid device dtype
  ) =>
  Randomizable
    (CNNSpec dtype device)
    (CNN dtype device)
  where
  sample CNNSpec =
    CNN
    <$> sample (Conv2dSpec @1 @20 @5 @5)
    <*> sample (Conv2dSpec @20 @50 @5 @5)
    <*> sample (LinearSpec @(4 * 4 * 50) @500)
    <*> sample (LinearSpec @500 @10)
To utilize our model during training, we require a function that accepts input tensors (representing images) and produces output tensors:
cnn ::
  forall batchSize dtype device.
  _ =>
  CNN dtype device ->
  Tensor device dtype '[batchSize, DataDim] ->
  Tensor device dtype '[batchSize, ClassDim]
cnn CNN {..} =
  forward fc1
    . relu
    . forward fc0
    . reshape @'[batchSize, 4 * 4 * 50]
    . maxPool2d @KernelSize @Strides @NoPadding
    . relu
    . conv2dForward @NoStrides @NoPadding conv1
    . maxPool2d @KernelSize @Strides @NoPadding
    . relu
    . conv2dForward @NoStrides @NoPadding conv0
    . unsqueeze @1
    . reshape @'[batchSize, Rows, Cols]
To keep it simple, I have excluded elements like training loops from this code. Nevertheless, the model is saved as a .pt file and is available in this repository. This is crucial as it facilitates future utilization or integration into other languages, such as C++ or Python, thanks to the existing PyTorch ecosystem in those environments.
Conclusions and Final Thoughts
Honestly, this experience was both fun and interesting. Thanks to Foreign Function Interface (FFI), Hasktorch successfully integrates PyTorch into the Haskell ecosystem. While this was only an introduction to the basics, I encourage you to explore the many examples available in their repository to learn more and experiment with them. Personally, I initially found it challenging to understand how to implement neural networks with Hasktorch, but it proved to be a genuinely interesting endeavor.
Important links:
- https://docs.pytorch.org/tutorials/advanced/cpp_frontend.html
- https://docs.pytorch.org/docs/stable/cpp_index.html
- https://medium.com/@pouyahallaj/libtorch-the-c-powerhouse-driving-pytorch-ee0d4f7b8743
- https://docs.pytorch.org/cppdocs/#aten
- https://hasktorch.github.io/tutorial/05-differentiable-programs.html
- https://next.fpcomplete.com/blog/inline-c/
- https://downloads.haskell.org/ghc/latest/docs/users_guide/exts/ffi.html#foreign-function-interface-ffi