


Introduction
Machine learning (ML) is getting more and more popular each day. You can see it being applied in many apps that you probably use on a daily basis like Instagram, Facebook, TikTok, etc. Have you ever used a filter that follows your face around in the camera? Well, most of them are just machine learning models that were trained to detect faces, including the eyes, nose, and mouth.
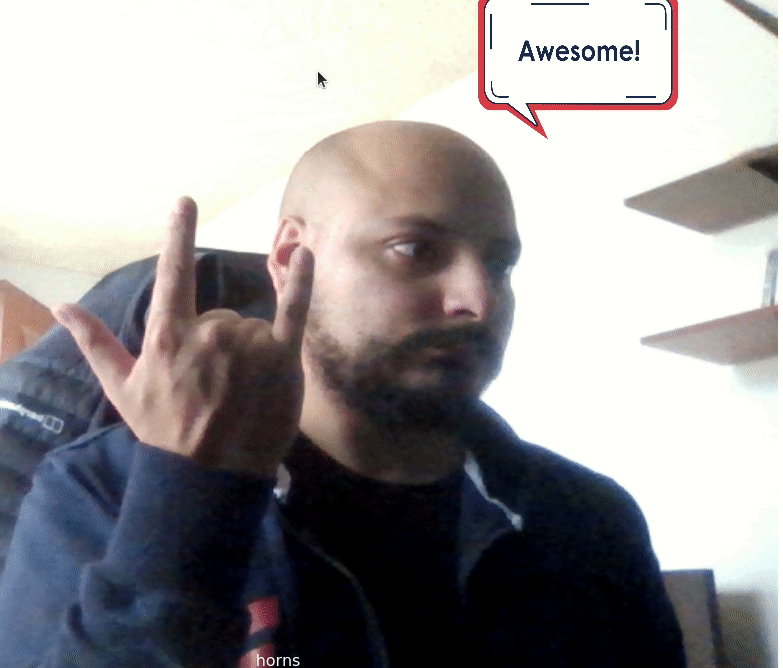
Another model that is also really interesting is one that can detect hands and more specifically hand gestures. In this tutorial, I’ll teach you how to create a virtual camera using Open Broadcast Studio that detects hand gestures to show different images on the screen with the help of the libraries Handsfree.js and p5.js (look at the finished project below). You don’t have to be an expert on programming or ML algorithms to implement this, so don’t be afraid! I’ll explain everything as best and simply as possible so keep reading, grab some coffee and let’s start coding.
What is Machine Learning, anyway?
Actually, before we start coding, let’s review some key concepts to help us understand what we are going to build.
I have mentioned Machine Learning or ML a lot already, but what does it mean? We can define it as a branch of artificial intelligence that focuses on designing algorithms and statistical models that enable computer systems to learn from data, improve performance on a specific task, and make predictions or decisions based on new input data.
Ok, that sounds great but maybe it can be a bit confusing. Let’s look at the key components of ML and an example to clear things up.
Fundamental components of ML
There are three fundamental components of ML:
- Dataset
Dataset, in the context of supervised learning, is a collection of examples or instances that have been labeled or annotated with some sort of target variable or output, which is used to train a machine learning algorithm.
Datasets can come in various forms, such as tables, spreadsheets, or text files, and can contain various types of data, including numerical, categorical, or text data. A dataset can be small or large, depending on the size of the problem it aims to solve and the resources available to process it.
- Algorithms
ML algorithms are the procedures implemented in code which predict output values from given input data. Some examples of these algorithms are Linear Regression, kNN, Naive Bayes, etc.
- Models
An ML model is a representation of an algorithm with its parameters trained to recognize certain kinds of patterns. You train a model over a set of data, providing it with an algorithm that can be used to predict and learn from those data.
Example
Now that we know the fundamental components of ML, let’s look at a trivial example to understand how to apply it.
We are given the task of determining if the mouse's position is on the right or left side of the screen. The screen is 400 px wide, and the position is stored in a variable called mouseX.
This can easily be done with the following code:
if(mouseX < 200){
  console.log("I'm on the left!")
} else {
  console.log("I'm on the right!")
}
Now how would we solve it using machine learning?
Look at the following image:

We create a dataset where we assign a label to various numbers depending on whether they are part of the right or left side of the screen. This dataset is then used as input for training an ML algorithm which will produce a model that can predict where the mouse position is based on the data it received.
This is just an instructive example (you don’t want to use ML to solve this problem) but hopefully, you get a clear view of the basics of how ML works.
Note: To be more precise this is an example of supervised learning in ML. In supervised learning, the algorithm learns to predict a target variable based on labeled examples provided in a training dataset, while in unsupervised learning, the algorithm learns to identify patterns or structure in a dataset without explicit labeling.
Understanding Handsfree.js
Handsfree.js is an open-source JavaScript library that helps to add face, hand, and pose tracking to our front-end projects, using pre-trained models provided by Tensorflow.js.
A pre-trained model is a machine learning model that has been trained on a large dataset and saved, so that it can be reused for a different task or application.
The purpose of this library is to give users a more friendly and beginner approach to machine learning models and their data.
For the hands model, we can easily access hand landmarks, pinching states, and gestures in the object.
Before we continue, let’s talk about p5.js
It’s time to talk about another handy JavaScript library called p5.js. You may be asking, why? Well, don’t forget that the purpose of this project is to build a virtual camera where we can show different images on the screen depending on the gesture that our hand is making.
We need a way to keep updating the data in the model inside an “infinite loop” so that it is always reading our gestures in the camera. That way we will always get a prediction that will change as soon as we make a new gesture. Once we get the prediction, we must draw an image on the screen accordingly.
This is exactly what p5.js is used for. It is a library that gives us a full set of drawing functionality for our project in order to create powerful animations.
Every p5.js project needs these two functions to work:
- setup(): this function is where you define the size of the canvas where your project will show and initialize the variables and settings that you want to use.
- draw(): this one is really important to understand. The draw function is an infinite loop that runs at 30fps. This is how we can update variables and start animating things on the screen.
We’ll see how to use these functions in the next steps when we start coding our project.
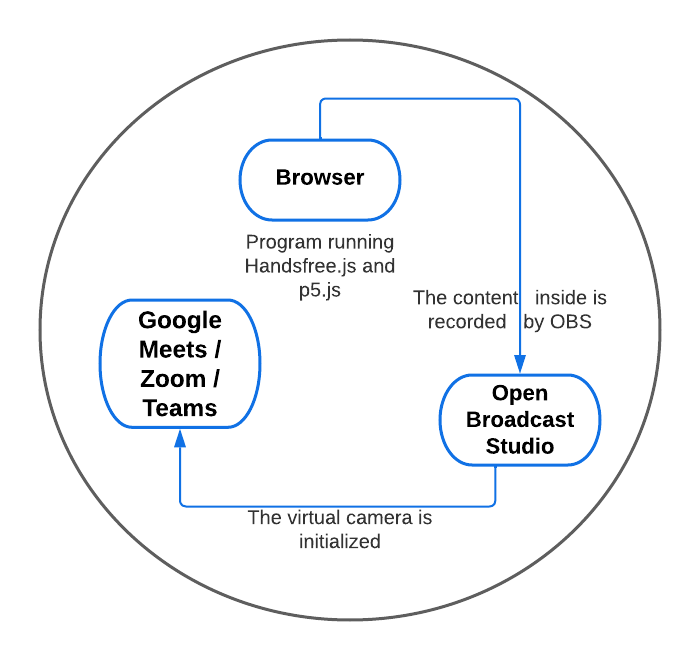
The architecture of our project
Coding time: Implementing Handsfree.js with p5.js
We can finally start coding our project! (Remember that you can find the link to the repository at the end of the coding tutorial.)
First, we need to structure the directory and files we are going to use:

Let’s start with the index.html since it is the most basic part. This is the file where we are going to load the libraries and scripts needed for our project. You can copy the example below or visit the official website for p5.js and handsfree.js to get the link for the latest release and update correspondingly.
index.html
<!DOCTYPE html>
<html lang="en">
 <head>
   <script src="https://cdnjs.cloudflare.com/ajax/libs/p5.js/1.2.0/p5.js"></script>
   <script src="https://cdnjs.cloudflare.com/ajax/libs/p5.js/1.2.0/addons/p5.sound.min.js"></script>
   <link rel="stylesheet" type="text/css" href="style.css">
   <meta charset="utf-8" />
   <link rel="stylesheet" href="https://unpkg.com/handsfree@8.4.2/build/lib/assets/handsfree.css" />
   <script src="https://unpkg.com/handsfree@8.4.2/build/lib/handsfree.js"></script>
 </head>
 <body>
   <script src="gestures.js"></script>
   <script src="sketch.js"></script>
 </body>
</html>
We also need a folder called images (or any name you want to use) where we will store the images that we want to show for every gesture. It can be a png, jpg or even a gif file. You can download the images we are using in this tutorial in the link for the GitHub repository.
Now we will continue with the file called sketch.js. This is basically where all the logic of the project is going to be. Consider it as the “main” function of the program.
Let’s start by defining 3 variables: video, label and imgList.
// Video
let video;
// To store the classification
let label = "";
// To store the images to show
let imgList = [];
- video: this variable will store the data coming from the webcam so that it can be showed on the browser
- label: this variable will store the hand gesture prediction coming from the model.
- imgList: this array will contain all the images that we want to show according to the hand gesture
Now we have to write a function called preload. This is a p5.js built-in functionality that is used to handle asynchronous loading of external files in a blocking way. If a preload function is defined, p5.js will automatically detect it and wait until any load calls within have finished to continue executing the rest of the code.
function preload() {
 srcThumbsUp = loadImage("images/ok.png");
 srcHorns = loadImage("images/horns.png");
}
This is the perfect place to load our images. We will do this with another built-in function called loadImage. This function takes as an argument the path of the image we want to load and creates a p5.Image object with it.
Let’s continue with the setup function. Here we will initialize the variables, model and all configurations needed for our project to start.
First, let’s start with the createCanvas function:
function setup () {
 createCanvas(1000, 680)
}
This creates a canvas element in the document and sets its dimensions in pixels. The canvas is the place where all the project will be shown, so make sure to make it big enough according to the size and resolution of your screen.
Now we need to initialize the handsfree model to start using it. We do this by adding the next block of code:
handsfree = new Handsfree({
   //showDebug: true, // Comment this out to hide the default webcam feed with landmarks
   hands: true
 })
Since handsfree lets us access various models (hands, face and poses) we need to specify which ones we want to use. In this case we only need the hands model, so we assign true to the property hands.
(Note: You can add the showDebug property to see the landmarks in your hands in the webcam feed)
Creating and loading hand gestures
The next step is to create the gestures we want to use in our project and load them into the handsfree model. For this, we need to head into the next link: https://handsfreejs.netlify.app/gesture/
This is the official website for the handsfree.js library. The process is pretty straightforward and you will find the steps and instructions inside the link. To sum it up you’ll have to:
- Start the handsfree model (you will see the webcam activates and the landmarks in your hands)
- Record the gesture you want to use (e.g. wave, stop, horns, ok)
- Clean the data (erase any record which you think isn’t useful)
- Copy the gesture object which will be available on the Gesture Description box.
Once you have the object that describes your gesture, you’ll have to copy and paste it on the file gestures.js.
For this, we will first create a constant named _gestures. _This is gonna be an object whose keys are gonna be the name of each gesture we created. In the following example I created a horn gesture, so my object looks like this:
const gestures = {
   hornGesture: {
       "name": "horns",
       "algorithm": "fingerpose",
       "models": "hands",
       "confidence": 7.5,
       "description": [
         [
           "addCurl",
           "Thumb",
           "NoCurl",
           1
         ],
         // the whole object goes here
Now that we have the object ready, let’s go back to the file sketch.js.
After initializing the handsfree model, we have to add the gestures we want it to use. This is done by using the useGesture method which receives as parameter a gesture object. We can access any of these objects by calling the variable gestures (which we declared on the gestures.js file) and then the name of the key we want to use. Finally, we call the enableGestures method to tell the model to load the gestures we added.
 handsfree.useGesture(gestures.hornGesture)
 handsfree.useGesture(gestures.thumbsupGesture)
 handsfree.enableGestures()
We can also create two buttons on the HTML page to start and stop the model, in case we need to restart it.
This can easily be done by using the built-in p5.js function called createButton. This will add a button tag to the HTML page with any name we want. Any action we want to perform when we click the button is added by accessing the mousePressed method as is shown in the image below:
// Create start model button
 buttonStart = createButton('Start Model')
 buttonStart.mousePressed(() => handsfree.start())
 // Create a stop button
 buttonStop = createButton('Stop Model')
 buttonStop.mousePressed(() => handsfree.stop())
The last step inside the setup function is to create and initialize the video variable. This variable is created with the function createCapture. This creates a new HTML5 <video> element that contains the audio/video feed from a webcam. The element is separate from the canvas and is displayed by default. Since we don’t want to show this element, we can hide it using .hide().
video = createCapture(VIDEO);
video.size(width, height);
video.hide();
That’s a wrap for the setup() function. Let’s move on with the draw() function. As I mentioned earlier, this function is a loop that will execute indefinitely and will serve us as a way to keep updating the prediction of our gesture and draw an image on the screen accordingly.
First, we have to draw the video inside the canvas so we can see our webcam and the gestures we are making. It is as simple as using the image() function. We will pass our video variable and the coordinates where we want it to appear.
function draw () {
 image(video, 0, 0);
}
If you run the app, you will notice that the video is flipped. To solve this problem we will use the next functions: push(), pop(), and scale()
- push() and pop() are two functions that always go together. The first one saves the current drawing style settings and transformations, while the latter one restores these settings. They allow you to change the style and transformation settings and later return to what you had. This is perfect for us because we want to flip only the video, not the whole canvas. _
- scale() increases or decreases the size of a shape by expanding or contracting vertices.
If it receives two parameters, then the first one scales on the x-axis of the canvas while the second one scales on the y-axis. Adding a value of -1 on the x-axis gives us the flip effect that we want for the video
The code would look like this:
//Draw and flip the video
 push();
 scale(-1,1)
 image(video, -width, 0);
 pop();
Notice that since we are scaling on a negative value, the video has to be drawn also from a negative value on the x-axis, which in this case is the negative equivalent to the width.
Now we need to write a function that returns the label, according to the gesture we are making on the camera. This is as simple as accessing the property inside the handsfree object as follows:
function getHandGestureLabel () {
 const hands = handsfree.data?.hands
   if (hands?.gesture) {
      if(hands.gesture[0]) {
       return hands.gesture[0].name ? hands.gesture[0].name : ""
      }
   }
}
As you can notice, the label is inside the gesture array in the name property. The number of elements inside this array depends on the number of hands that the gesture configuration allows. Since the gestures we configured only use one hand, we can access the first element of the array directly.
The next step is to take this label and draw the image that corresponds to it. We are also going to add a nice fade effect every time an image changes on the screen, so that it smoothly disappears when we change the gesture on the screen.
For this, we first have to write a function that returns a new object with fade and src properties. The fade property will always start at zero, while the src property will be assigned the corresponding image that we loaded at the beginning of the project (in the preload function):
function getImageWithSource(source) {
 return {
   fade: 0,
   src: source
 }
}
Now we are going to call this function on preload, with every image that we want to use and then we will add it to our imgList array. The final code for preload will look like this:
function preload() {
 srcThumbsUp = loadImage("images/ok.png");
 srcHorns = loadImage("images/horns.png")
 imgList.push(getImageWithSource(srcThumbsUp),
 getImageWithSource(srcHorns));
}
Next, we need a function that receives the label as a parameter and sets the fade property of the corresponding image in the array to 255. A simple switch statement is enough to solve this:
function fillImageFadeByLabel(label) {
 switch(label) {
   case "thumbsup":
     imgList[0].fade = 255;
     break;
   case "horns":
     imgList[1].fade = 255;
     break;
   default:
     break;
 }
}
Finally, we will write the function that displays the image on the screen. We have to iterate over our image array and check if the fade property is greater than zero. If that is the case, then we will draw the image and decrease its fade value so that it slowly fades when another label comes in.
function drawImage(imageList) {
 imageList.map(img => {
   if(img.fade > 0) {
     tint(255, img.fade);
     image(img.src, width - 300, 0, 200, 150);
     img.fade -= 20;
   }
 })
}
The tint() function sets the fill value for displaying images. Images can be tinted to specified colors or made transparent by including an alpha value.
In order to apply transparency to an image without affecting its color, we use white (255) as the tint color and specify an alpha value (fade property).
We are almost there! Now we have to call these functions inside draw() to finish the project. The final code for this looks as follows:
function draw () {
 tint(255)
 //Draw and flip the video
 push();
 scale(-1,1)
 image(video, -width, 0);
 pop();
 label = getHandGestureLabel()
 fillImageFadeByLabel(label);
 drawImage(imgList);
 // Draw the label
 fill(255);
 textSize(16);
 textAlign(CENTER);
 text(label, width / 2, height - 4);
}
You can now start the project on any HTTP server and open the browser to see how it works.
Remember to find the code in this repo: https://github.com/stackbuilders/blog-code/tree/main/javascript/hand-gesture-recognizer
Creating a virtual camera with Open Broadcast Studio (OBS)
We have our project finished up and running on the browser but it is not so much fun when only you can see it, right? Let’s create a virtual camera so that we can use it in any of our virtual meetings in Zoom, Microsoft Teams,Google Meetings, or whatever tool you use.
OBS is a free and open source software for video recording and live streaming. You can download it on your computer by following the instructions on the official page (Link: https://obsproject.com/)
After installing the software, open it and you’ll see an empty project with 5 main options in the bottom of the window:
- Scenes
- Sources
- Audio Mixer
- Scene Transitions
- Controls

Recording our webcam and project window
Select the default scene, then head to Sources to the + icon and select Video Capture Device. A window will pop up where you have to write a name for that source (in this case I am using the name “webcam”). Click on OK and then another window will pop up, this time with the properties for this source. You can select here the webcam you want to use and adjust other things like color, brightness, frame rate, etc. After you finish, click on OK and you will see the source added to the list.
You will also see the input of the camera in the main window of the program. Make sure to adjust the size so that it occupies the whole scene.
For the next step, make sure that you are running the program with hand gestures on the browser and keep the tab open.
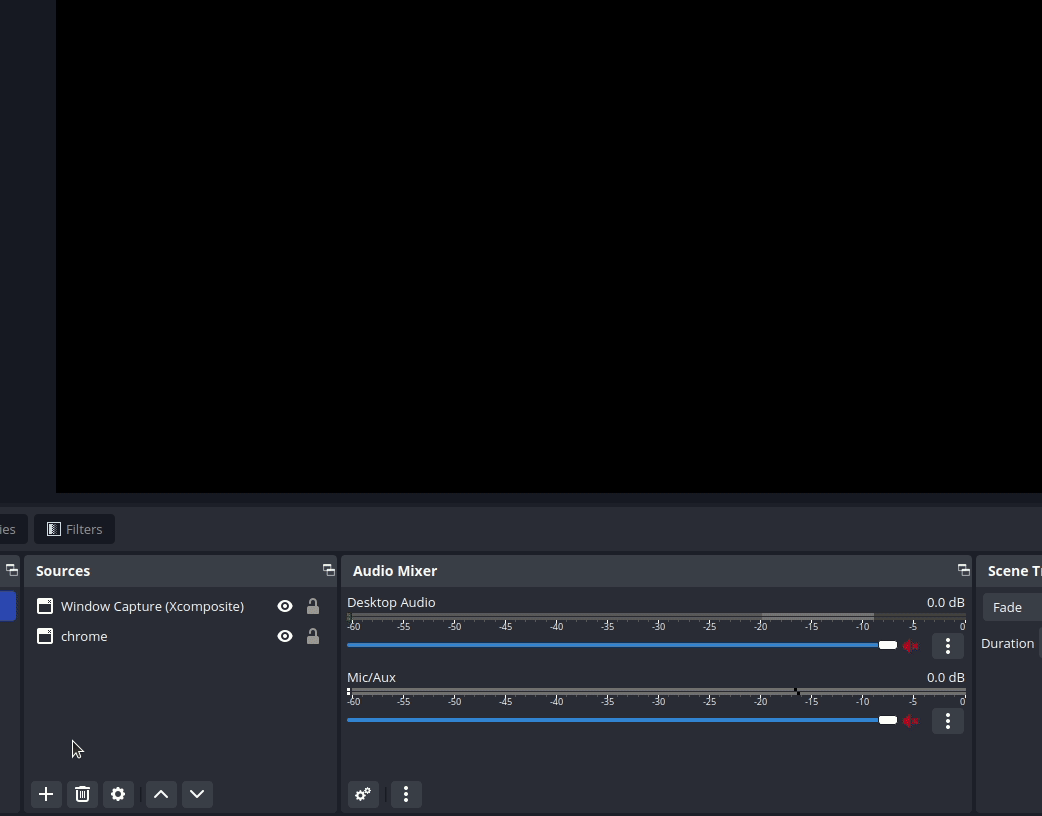
Now go back to OBS and add another Source to the list, just like we did with the webcam. The difference is that now you have to select Window Capture. Give this source a name (I will be using “Chrome”) and then on the properties window, you’ll see a list with all the windows that you have running on your computer. Select the one that is running our hand gesture program.
You will see that it is now showing on the scene over the webcam input. As before, adjust the size so that the canvas occupies the whole scene.
Modifying our program to only show images
Now, since OBS is taking care of the webcam, we don’t want to show it anymore using p5.js. This will significantly improve the frame rate and performance of our project. What we are going to do is modify the code so that instead of showing the webcam input, it just shows a green screen as background.
Go back to the sketch.js file and modify as follows:
function draw () {
 background(0,255,0)
 tint(255)
 label = getHandGestureLabel()
 fillImageFadeByLabel(label);
 drawImage(imgList);
 // Draw the label
 fill(255);
 textSize(16);
 textAlign(CENTER);
 text(label, width / 2, height - 4);
}
Notice how we are no longer drawing the video, and how we are adding a green background with background(0,255,0). If you rerun the program, you’ll notice how the images still appear depending on the gesture you are making, but on a green background. You can find an example on how it should look in the next gif:

You’ll probably be asking “Why are we doing this?”. Well, to answer this question, let’s go back to our project in OBS and talk about something called Chroma Key.
Adding the Chroma Key Filter
Chroma key compositing, or chroma keying, is a visual-effects and post-production technique for compositing (layering) two images or video streams together based on color hues (chroma range). Since we have two video sources that are on top of each other in our OBS project, we need to combine them to just one, using this technique.
Right click on our window source, (in this case I called it “Chrome” as you may remember). Select the Filters option on the menu that appears and a new window will pop up. Click the + icon on the bottom left and select Chroma Key. Specify a name, and click on OK. You will see a list of properties and one called Key Color Type. Click the list of options and select Green, since that is the color that we modified on our program. Close the window and now you will see on the scene that the window source is no longer overlaying the webcam. We are able to see both the webcam source and the images of the hand gesture window!

Our virtual camera is almost done! The final step is pretty easy, just go to the Controls option on the bottom right of the OBS window and you will see a button labeled Start Virtual Camera. Click on it and that’s all. OBS will generate the virtual camera with the current scene in the project. To use it, just go to your favorite virtual meeting app and when it asks you to select a camera, you will now see as part of the options, “Virtual Camera (OBS)”. Select it and you will be able to join in and show the gesture images on the screen to everybody!
Note: remember that in order for this to work, you have to keep both OBS and the hand gesture program running.
Thanks for reading and sticking until the end. This project was made to show the awesome capabilities of ML and how easily accessible it is nowadays for developers. It opens up many possibilities to create and develop software, so be sure to keep an eye out for this fascinating topic.