


This tutorial shows how to build a graphical user interface (GUI) application in Haskell using bindings to GTK+. While working on a calculator program, we'll cover the following topics:
- GTK+ terminology
- Writing handlers that process user actions (button click, etc.)
- Introducing global state
- Manual creation of forms and creation of forms using Glade
Once you finish with the tutorial, you will have a solid understanding of how
to move on, read the documentation of the
gtk3 package, and accomplish
your tasks.
The tutorial does not assume any knowledge of Haskell except for a very basic understanding of how to work with the IO monad. The GTK+ binding is very straightforward and imperative in its nature. This may be seen as a downside, but I think it also may make things easier for newcomers to Haskell programming with an imperative background.
Available libraries
Before we start with GTK+ bindings, it's reasonable to ask whether there is a better/alternative solution. Indeed, several libraries are available to create GUI in Haskell:
-
wx— bindings to wxWidgets. A couple of things about this package I find suspicious: 1) it had delays in development when for a couple of years no new version was released, 2) it's still not present on Stackage. A practical conclusion from the point 2 is that it's not very popular nowadays, or at least not many Haskellers start writing any application with it otherwise it would be added already. -
X11— direct translation of the C binding to X11 graphics library (quote taken from the package description). “Direct translation” means that you pass around pointers. Yes, in Haskell code. For documentation the authors suggest looking at The Xlib Programming Manual (although Haddocks are not blank either). Last release was in Sep 14, 2022. -
hsqml— the Haskell bindings to Qt Quick. Missing from Stackage. Releases seem to happen once a year. -
fltkhs— the Haskell bindings to the FLTK GUI library. The last release of this package was in Oct 2015 and it has not been kept up to date. Anyway, I personally don't see any benefit in using it over more mature solutions.
For more alternatives and a comprehensive overview of GUI libraries in Haskell, check out Applications and libraries/GUI libraries As to GTK+, it seems to be:
-
Easy to install.
-
Robust and mature. Documentation is quite good and comprehensive.
It's worth mentioning that Haskell has developed a much stronger ecosystem with respect to web-development than GUI and desktop development in general. For further reference about the state of standalone GUI applications in Haskell, refer to:
- The section in Gabriella Gonzalez's State of Haskell Ecosystem
Installation
For installation instructions of C libraries required by Gtk2Hs and haskell-gi, please refer to the Gtk2Hs Github Repository. The installation process may vary depending on your operating system, so make sure to follow the instructions specific to your platform.
WARNING: This setup is incompatible with ARM architectures.
First steps
Setting Up
We'll walk through setting up a Haskell project using Stack. We'll focus on Stack for its simplicity and popularity within the Haskell community, although Cabal is another option for managing Haskell projects.
1. Install Stack:
If you haven't already installed Stack, you can do so by following the instructions provided on the official website: Stack Installation Guide.
We suggest using GHCup for managing Haskell compilers and tools. GHCUP simplifies the installation and management of GHC (Glasgow Haskell Compiler), Cabal and Stack.
Whatever the case may be, in this tutorial we use the following versions, so be sure to use the same ones:
Stack 2.11.1
cabal 3.10.2.1
GHC 9.4.7
2. Create a new project
stack new gtk-gui
cd gtk-gui
3. Install the necessary tools for gtk2hs:
You need to install some tools to build GTK+ bindings. Run the following commands:
stack install alex happy
stack install haskell-gi
stack install gtk2hs-buildtools
stack install
4. Add the gtk3 module to .cabal file:
Open the generated .cabal file in the gtk-gui directory and add gtk3 to the build-depends section. Example:
build-depends:
    base >= 4.7 && < 5,
    gtk3
5. Build the project
stack build
6. Run the project:
After the build is successful, you can run your Haskell project with:
stack exec gtk-gui-exe
Note: if you have chosen another project name, make sure you see the name of the executable in your .cabal file.
Implementation
The calculator application has been chosen because its logic is very straightforward and we can focus on working with the GTK+ framework without much distraction while keeping the tutorial reasonably practical.
Let's start by importing some modules:
import Control.Monad
import Control.Monad.IO.Class
import Data.IORef
import Graphics.UI.Gtk hiding (Action, backspace)
As I said, GTK+ bindings are very imperative. All binding code lives in IO
monad except for some cases that we will cover shortly.
main :: IO ()
main = do
  void initGUI          -- (1)
  window <- windowNew   -- (2)
                        -- (3)
  widgetShowAll window  -- (4)
  mainGUI               -- (5)
-
The first thing we need to do in any program that uses GTK+ is to call the
initGUIfunction. This function allocates some resources and prepares GTK+ for work, it also looks up command line arguments that are relevant to GTK+, parses them, and returns all non-parsed arguments. For our purposes, we don't need the command line arguments, so let's wrap it withvoid. -
Next, we need a window to build the interface of our calculator inside it. To create a new top-level window we use the
newWindowaction. It returns an opaqueWindowvalue that can be used to manipulate the window. -
After creation of a new window we typically want to change some parameters and then render it. For now we just render the window “as is”, but in the next section we will see how to customize widgets using attributes.
-
widgetShowAllworks with any kind of widget. It performs all the necessary allocations and makes the widget passed to it as an argument visible together with all its children widgets. -
mainGUIis the main loop. The loop listens to events such as button click and mouse pointer movement and lets appropriate handlers run.
A note about threads. Make sure that all GTK actions happen on the same OS thread (note, this is different from lightweight Haskell threads). This is only important when you compile with multi-threaded runtime, but who knows, maybe the need for concurrent execution will arise later, so my advice is to keep all GTK-related code in one thread and the simplest way to do it is to keep everything in the main thread. For more information about multi-threaded GUIs with GTK+ see Threading and Gtk2Hs.
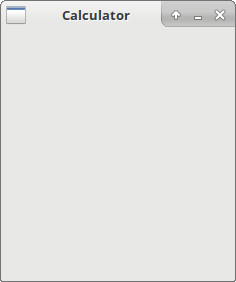
If we compile and run the program we will see the following:

Nothing fancy. One nasty detail is that when we close the window the program continues to run. This is because the default handler for click on the “close” button of window just makes it invisible, and the main loop mainGUI continues to run. We will see how to handle this situation
properly soon.
Attributes
Attributes allow us to customize widgets, such as our window. There are two methods to specify widget attributes:
-
Set them with the
setaction. -
Use Glade to design your UI.
We will touch the second option later, but for now let's become familiar with the set action. Typical usage of set is the following:
set widget [ attributeA := valueA, attributeB := valueB, … ]
The GTK modules are structured by widget type, and every module typically has the “attributes” section. This is how to find out which attributes we can tweak. For example a Window has the following:
windowTitlewindowTypewindowResizable
…and many others. Let's change the title of our window and make it non-resizable by creating an independent function to render the window:
main :: IO ()
main = do
  void initGUI
  window <- renderWindow
  widgetShowAll window
  mainGUI

renderWindow :: IO Window
renderWindow = do
  window <- windowNew
  set window [ windowTitle         := "Calculator"
             , windowResizable     := False
             , windowDefaultWidth  := 230
             , windowDefaultHeight := 250 ]
  pure window
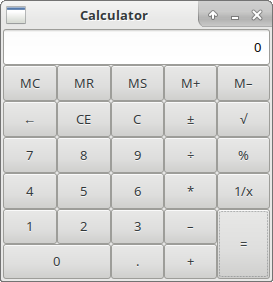
Looks like it works:
Containers
Still, even a non-resizable window with a title is boring. What we would like to do is to put something inside that window. This brings us to the GTK+ notion of container. A container is a widget that can contain other widgets inside. There are two types of containers:
-
those that serve purely decorative purpose and can contain only one widget;
-
those that help organize forms and can contain several widgets.
Inner widgets are typically called children, while the enclosing widget is called parent.
Most important actions that you will want to perform on containers are:
-
containerAdd parent childto addchildwidget toparentwidget -
containerRemove parent childto removechildwidget fromparentwidget -
containerGetChildrento get all children of a container widget -
containerForeachto perform an action on all children of a container
For now we will need a non-editable text area where we will show the number that is being entered and result of computations:
main :: IO ()
main = do
  void initGUI
  window <- renderWindow
  display <- renderDisplay
  widgetShowAll window
  mainGUI

renderDisplay :: IO Entry
renderDisplay = do
  display <- entryNew
  set display [ entryEditable := False
              , entryXalign   := 1 -- makes contents right-aligned
              , entryText     := "0" ]
  pure display
We use the Entry widget to display numbers, but it's not editable and right-aligned. We don't hurry to insert it into our window because we need some sort of “grid” to make the form look like a real calculator.
Indeed, there is the Grid widget in the Graphics.UI.Gtk.Layout.Grid module. This is an example of a more complex container that has its own interface for better control of layout. We will be using the following
functions from its API:
-- | Creates a 'Grid'.
gridNew :: IO Grid

-- | Sets whether all rows of grid will have the same height.
gridSetRowHomogeneous :: GridClass self
  => self              -- ^ The grid
  -> Bool              -- ^ 'True' to make rows homogeneous
  -> IO ()

-- | Adds a widget to the grid. The position of child is determined by left
-- and top. The number of “cells” that child will occupy is determined by
-- width and height.
gridAttach :: (GridClass self, WidgetClass child)
  => self    -- ^ The grid
  -> child   -- ^ The widget to add
  -> Int     -- ^ The column number to attach the left side of child to
  -> Int     -- ^ The row number to attach the top side of child to
  -> Int     -- ^ Width — the number of columns that child will span
  -> Int     -- ^ Height — the number of rows that child will span
  -> IO ()
gridNew and gridSetRowHomogeneous should be self-explanatory. gridAttach allows users to insert widgets into the grid controlling their position and size. This is very handy for our calculator application, let's use it:
main :: IO ()
main = do
  …
  grid <- gridNew                  -- (1)
  gridSetRowHomogeneous grid True  -- (2)
  let attach x y w h item = gridAttach grid item x y w h -- (3)
  attach 0 0 5 1 display           -- (4)
  mkBtn "MC"  >>= attach 0 1 1 1   -- (5)
  mkBtn "MR"  >>= attach 1 1 1 1
  mkBtn "MS"  >>= attach 2 1 1 1
  mkBtn "M+"  >>= attach 3 1 1 1
  mkBtn "M–"  >>= attach 4 1 1 1
  mkBtn "←"   >>= attach 0 2 1 1
  mkBtn "CE"  >>= attach 1 2 1 1
  mkBtn "C"   >>= attach 2 2 1 1
  mkBtn "±"   >>= attach 3 2 1 1
  mkBtn "√"   >>= attach 4 2 1 1
  mkBtn "7"   >>= attach 0 3 1 1
  mkBtn "8"   >>= attach 1 3 1 1
  mkBtn "9"   >>= attach 2 3 1 1
  mkBtn "÷"   >>= attach 3 3 1 1
  mkBtn "%"   >>= attach 4 3 1 1
  mkBtn "4"   >>= attach 0 4 1 1
  mkBtn "5"   >>= attach 1 4 1 1
  mkBtn "6"   >>= attach 2 4 1 1
  mkBtn "*"   >>= attach 3 4 1 1
  mkBtn "1/x" >>= attach 4 4 1 1
  mkBtn "1"   >>= attach 0 5 1 1
  mkBtn "2"   >>= attach 1 5 1 1
  mkBtn "3"   >>= attach 2 5 1 1
  mkBtn "–"   >>= attach 3 5 1 1
  mkBtn "="   >>= attach 4 5 1 2
  mkBtn "0"   >>= attach 0 6 2 1
  mkBtn "."   >>= attach 2 6 1 1
  mkBtn "+"   >>= attach 3 6 1 1
  containerAdd window grid         -- (6)
  …
-
gridNewcreates a new grid. -
gridSetRowHomogeneous grid Truemakes every row have equal height. -
Here we define the attach helper function. It attaches the given widget to our
grid. The argument order of this function helps to use it with the>>=operator, also known as thebindoperator. The>>=operator is commonly used to chain monadic actions in Haskell, enabling the composition of operations. In our case, we can use>>=to chain multiple attach calls and thus build the desired widget layout within our grid. -
We attach the
displaywe created previously to thegrid. It will occupy the entire top row. -
Here, we use a combination of the
mkBtnhelper andattachto quickly create buttons and place them on the grid. I'll show you whatmkBtnis in a moment. -
Now, the grid needs to be inserted into the
windowto be visible. This is done with the help of the above-mentionedcontainerAddfunction.
mkBtn is a helper for button creation; right now, it's very simple:
mkBtn :: String -> IO Button
mkBtn label = do
  btn <- buttonNew
  set btn [ buttonLabel := label ]
  return btn
We create a new button, set its attributes (just label in our case), and return the button.
Signals and events
The application looks like a calculator but does not behave like one yet. We need to learn about signals and _events_to fix this.
Signal is a name for things that may happen on the form. Almost always signals are connected with the user's actions. An example of signal is focus —the moment when a widget becomes active on the form.
To execute some code on signal we use the on helper:
on :: object -> Signal object callback -> callback -> IO (ConnectId object)
Here object is the widget of interest, callback is the action we want to perform. The on function returns ConnectId parameterized over the object type (so we cannot mix up connection identifiers for different types of objects). This is the identifier of signal handler, and its sole purpose is to give you a way to disconnect a signal handler if you ever need it. You can use the disconnect function from System.Glib.Signals to do that.
Every signal dictates the type that callback function will have. The following cases are the most frequent:
-
Just
IO (): no information is given to the handler, and it is not expected to return anything. Example of such a signal isshowSignal. -
Handlers that are given arguments:
a -> IO Bool. An example of such a signal isfocuswhose handlers have the typeDirectionType -> IO Bool. Another interesting thing is the returned value of the typeBool. This is a convention in GTK+ allowing to disable default handling of some signals. If we returnTrue, default handling will be disabled, whileFalsewill keep it active, executing our handler and default handler as well.
There is one more way to get information from within a signal's handler. Some signals dictate that the handler should live in a special monad called EventM instead of plain IO. Signals like their handlers in EventM are called events.
What is the EventM monad? Actually, it's a type synonym for a simple monad stack with IO at the bottom:
type EventM t = ReaderT (Ptr t) IO
This is just a reader monad transformer on top of IO. t specifies the type of information we can extract and which helper function we can use inside the EventM monad. These are different for every event. For example, configureEvent allows to extract information about window size, while keyPressEvent event provides information about the key that has been
pressed, which modifier key was held at that time, and so forth. The type system does not allow us to try to extract information that a particular event does not provide.
I would like to quote the docs to accent the importance of returned Boolean value:
Note that an event handler must always return
Trueif the event was handled orFalseif the event should be dealt with by another event handler. For instance, a handler for a key press should returnFalseif the pressed key is not one of those that the widget reacts to. In this case, the event is passed on to the parent widgets. This ensures that pressing, say,Alt-Fopens the file menu even if the current input focus is in a text entry widget. In order to facilitate writing handlers that may abort handling an event, this module provides the functiontryEvent. This function catches pattern match exceptions and returnsFalse. If the signal successfully runs to its end, it returnsTrue.
Knowing all that, we can write a simple handler to run on button activation. Looking at the “signals” section in Graphics.UI.Gtk.Buttons.Button, buttonActivated looks like our friend here:
-- | Emitted when the button has been activated (pressed and released).
buttonActivated :: ButtonClass self => Signal self (IO ())
Just for a test, let's rewrite mkBtn to attach a handler that will update the display with the name of the pressed button (we still don't know a whole lot to make a working calculator):
mkBtn :: String -> Entry -> IO Button
mkBtn label display = do
  btn <- buttonNew
  set btn [ buttonLabel := label ]
  btn `on` buttonActivated $
    set display [ entryText := label ]
  return btn
And we need to pass display to mkBtn like this:
  …
  mkBtn "MC"  display >>= attach 0 1 1 1
  mkBtn "MR"  display >>= attach 1 1 1 1
  …
Another thing that we can deal with now is proper closing of our application. For this, we need a way to call the mainQuit function:
-- | Exit the main event loop.
mainQuit :: IO ()
As you may have guessed by now, a convenient place to put the mainQuit function is on closing of window. The event that we're looking for is called deleteEvent:
-- | The deleteEvent signal is emitted if a user requests that a toplevel
-- window is closed. The default handler for this signal destroys the window.
-- Calling 'widgetHide' and returning 'True' on reception of this signal will
-- cause the window to be hidden instead so that it can later be shown again
-- without reconstructing it.
deleteEvent :: WidgetClass self => Signal self (EventM EAny Bool)
In our case, we just want to close it, so:
  …
  containerAdd window grid
  window `on` deleteEvent $ do -- handler to run on window destruction
    liftIO mainQuit
    return False
  widgetShowAll window
  mainGUI
Note that deleteEvent parametrizes EventM type by EAny type-level tag.
Its description:
-- | A tag for events that do not carry any event-specific information.
data EAny
Even though it does not carry any event-specific information, a lot of useful information can be extracted, such as current time at the moment when event fired (eventTime). See the full list of helpers in the “Accessor functions for event information” section of the Graphics.UI.Gtk.Gdk.EventM module.
I encourage you to compile and run the application to see that it responds to button activation and closes properly.
Using IORefs for application state
Buttons can change display dynamically, but it's still not enough to make our calculator actually useful. For this (as with most other applications), we need some sort of state.
The creators of GTK+ binding didn't give us too many options here because type of handler monad is fixed: it's either plain IO or EventM, which, as we already know, is just ReaderT (Ptr t) IO. We cannot return anything non-standard from handlers, so the only way to communicate with the outside world is via mutable references.
There are two most obvious options:
-
IORefs — mutable references insideIOmonad. -
TVars fromControl.Concurrent.STM.
TVars are probably overkill unless you do complex concurrent work. What is good about using TVars is that we can update them atomically. This may not be very important for some applications, but I recommend building with concurrency in mind from the very beginning. However, IORefs can be changed atomically as well with the help ofatomicModifyIORef`.
Now we get to the question of how to model calculator logic. Since actual logic is not our primary concern in this tutorial, we will go the easy way.
-- | 'Value' holds textual representation of first argument reversed and
-- 'Action' to apply to it, which see.
data Value = Value String (Maybe Action)

-- | Action to apply to first argument and textual representation of second
-- argument reversed (if relevant).
data Action
  = Addition       String
  | Subtraction    String
  | Multiplication String
  | Division       String
Value is our state; it contains a textual representation of the first argument and, optionally, a representation of an action that should be performed on it. The Strings representing arguments are reversed because this way, it's faster to add/drop a character at the end of the string. We will reverse the strings when it's time to turn them into Doubles.
We will need a couple of helper functions too. Here they are:
-- | Change second argument inside of 'Action'.
mapAction :: (String -> String) -> Action -> Action
mapAction f (Addition       x) = Addition       (f x)
mapAction f (Subtraction    x) = Subtraction    (f x)
mapAction f (Multiplication x) = Multiplication (f x)
mapAction f (Division       x) = Division       (f x)

-- | Get second argument from 'Action'.
getSndArg :: Action -> String
getSndArg (Addition       x) = x
getSndArg (Subtraction    x) = x
getSndArg (Multiplication x) = x
getSndArg (Division       x) = x

-- | Render given 'Value'.
renderValue :: Value -> String
renderValue (Value x action) =
  g x ++ f a ++ (if null y then "" else g y)
  where
    (a, y) =
      case action of
        Nothing                   -> ("", "")
        Just (Addition       arg) -> ("+", arg)
        Just (Subtraction    arg) -> ("–", arg)
        Just (Multiplication arg) -> ("*", arg)
        Just (Division       arg) -> ("÷", arg)
    f "" = ""
    f l  = " " ++ l ++ " "
    g "" = "0"
    g xs = reverse xs
The first two help change and extract the second argument in Action, while renderValue does its best to render the current calculator state. Having renderValue, it's easy to write a function that would update the calculator display:
-- | Make calculator's display show given 'Value'.
updateDisplay :: Entry -> Value -> IO ()
updateDisplay display value =
  set display [ entryText := renderValue value ]
Finally, instead of mkBtn let's have mkButton of the following form:
-- | Create a button and attach handler to it that mutates calculator's
-- state with given function.
mkButton
  :: IORef Value       -- ^ 'IORef' to calculator state
  -> Entry             -- ^ Our display to update
  -> String            -- ^ Button label
  -> (Value -> Value)  -- ^ How this button affects calculator state
  -> IO Button         -- ^ Resulting button object
mkButton st display label mutateState = do
  btn <- buttonNew
  set btn [ buttonLabel := label ]
  btn `on` buttonActivated $ do  -- (1)
    value <- atomicModifyIORef st $ \x -> let r = mutateState x in (r, r) -- (2)
    updateDisplay display value  -- (3)
  return btn
-
Just like before, we register a handler that will fire on button activation.
-
atomicModifyIORefmodifies givenIORefatomically. The callback should return a tuple, first element is the new value to put intoIORef, second value is the return value of the action. In this case we want the values to be equal. -
We call
updateDisplayto make the results of last action visible to the user.
Now we can define a helper called mkBtn in main:
main :: IO ()
main = do
  st <- newIORef (Value "" Nothing) – (1)
  void initGUI
  window <- renderWindow
  display <- renderDisplay
  grid <- gridNew
  gridSetRowHomogeneous grid True
  let attach x y w h item = gridAttach grid item x y w h
      mkBtn = mkButton st display – (2)
  attach 0 0 5 1 display
  mkBtn "MC"  id >>= attach 0 1 1 1 – (3)
  mkBtn "MR"  id >>= attach 1 1 1 1
  …
-
We need to create
IORefto keep the program's state there.Value "" Nothingis its initial value. -
The helper function
mkBtnuses previously writtenmkButtonand just saves us the boilerplate of passingstanddisplayagain and again. -
Some examples of
mkBtnuse. By passingidas a state mutating function, we make buttons have no effect, but all the machinery for actual work is already in place.
The only thing that remains is state-mutating functions per button. Here I will show some of them:
-- | Change state as if a dot is entered.
enterDot :: Value -> Value
enterDot (Value x action) =
  let f xs = if '.' `elem` xs then xs else '.' : xs
  in case action of
       Nothing -> Value (f x) Nothing
       Just  a -> Value x (Just $ mapAction f a)

-- | Change state as if specific char (digit) is entered.
enterDigit :: Char -> Value -> Value
enterDigit ch (Value x action) =
  case action of
    Nothing -> Value (ch:x) Nothing
    Just  a -> Value x (Just $ mapAction (ch:) a)

-- | Change state as if last character of current argument is removed.
backspace :: Value -> Value
backspace (Value x action) =
  case action of
    Nothing -> Value (drop 1 x) Nothing
    Just  a -> Value x (Just $ mapAction (drop 1) a)

-- | Apply given operator to current state. If some action is already fully
-- constructed, evaluate it first.
operator :: (String -> Action) -> Value -> Value
operator op value =
  let (Value x action) = equals value
  in Value x $ Just $
    case action of
      Nothing -> op ""
      Just  a -> op (getSndArg a)

-- | Change state as if current argument is removed.
clearEntry :: Value -> Value
clearEntry (Value x action) =
  case action of
    Nothing -> Value "" Nothing
    Just  a ->
      if null (getSndArg a)
        then Value "" Nothing
        else Value x (Just $ mapAction (const "") a)

-- | Change state returning it to the default value.
clearAll :: Value -> Value
clearAll = const (Value "" Nothing)

-- | Evaluate current calculator's state putting result in place of first
-- argument.
equals :: Value -> Value
equals (Value x action) =
  case action of
    Nothing -> Value x Nothing
    Just  a ->
      if null (getSndArg a)
        then Value x action
        else Value result Nothing
          where
            g  :: String -> Double
            g ""       = 0
            g ('.':xs) = g ('0':'.':xs)
            g xs       = read (reverse xs)
            x' = g x
            y' = g (getSndArg a)
            result = reverse . show $
              case a of
                Addition       _ -> x' + y'
                Subtraction    _ -> x' - y'
                Multiplication _ -> x' * y'
                Division       _ -> x' / y'
The calculator is not perfect, but good enough for our purposes. Compile, run it and see how it works. Implementation of the rest of functionality is left as an exercise for the reader.
Hint: The complete calculator is available under the Stack Builders tutorial repository.
Using Glade to design forms
You may have noticed that the manual creation of forms introduces quite a bit of boilerplate in our code. This can become even worse as your forms get more complex. Because of this, I think it's time to try our hand on a modern UI designer for GTK+ called Glade.
Glade is straightforward to install and use. Open the application; you will see panels with various widgets: top-level objects (such as windows), containers, and controls (such as buttons).
Here is the plan for how to recreate our calculator form with Glade:
-
Select the window button on the topmost palette, and the window will appear in the working area.
-
Enter “Calculator” in the title field.
-
Don't forget to fill out the “ID” attribute of every widget; this is how you will access widgets on your form in the Haskell code.
-
Create a grid with id
grid. When asked about the number of rows and columns, choose 7 × 5. Select the “Homogeneous” check box under the “Rows” title. -
Insert entry, use the “Drag and resize widgets in the workspace” button on the top toolbar to make it occupy the entire top row.
-
Insert buttons to match our existing design.
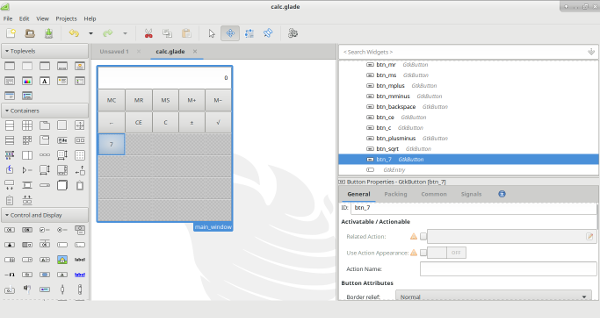
(Here is a bigger image.)
Hint: the complete Glade form of our calculator is available under the Stack Builders tutorial repository.
To use the form in Haskell code, we need Builder, which lives in the Graphics.UI.Gtk.Builder module. The Builder object helps with creating UI from XML files on the fly.
Here is how we could use it in our program:
  …
  builder <- builderNew                                 -- (1)
  builderAddFromFile builder "calc.glade"               -- (2)
  btn0 <- builderGetObject builder castToButton "btn_0" -- (3)
  …
-
We need to create a new builder.
-
Load our form into it from a file. There are other options such as loading form text (
String,Text) and so forth. Consult the docs for more information. -
Now the interesting part is that we can get the actual button object knowing its identifier. For example, here I'm retrieving a button that inputs zeros. It has the
"btn_0"identifier on my form.castToButtoncasts an abstract representation of an object to its typed form. There are manycastToSomethingfunctions, one per widget (for example we havecastToWindowfor windows).
Having the actual object, like that button or the main window itself, makes it easy to proceed, just like with the manually constructed form to start the main loop.
Conclusion
GTK+ Haskell binding certainly can be used to create professional-looking user interfaces. As I hopefully showed you in this tutorial, using the bindings is very straightforward and doesn't require any special knowledge. For small forms, Glade probably doesn't make much sense, but if you write something big, it may save you some tiresome work. Better yet, one doesn't have to be a Haskell programmer to design a UI with Glade — this fact makes it easier to divide work between people.